Finally, fridayevening! Miserable week at work, I'm happy it's weekend, and some new stuff arrived just in time, jay.
First up, a collection of Playmobil rocks
Seller took over a week to reply and baffled me by asking half the amount I was willing to pay for it, and even included free shipping. But when they arrived I noticed half of them won't stay upright on their own so they will need bases and some filler, so I put these in the to do pile. Still happy with them though.
Kim sent me out to get a gift for her nephew, something I needed to pick up at the local Action (a chain of discount stores, they sell Matt Black spraypaint for 2 or 3 euro a can, great for scenery). 15 minutes later, no toy (sold out) but did pick up this set for 80 cents.
One half will be for my future 20mm mosque, the other 1 and a half bit will be come planets for space games. I might even pick up some more, these are less then half price what the hobby store asks for them.
Picked up these 2 from a seller at the LAF, really nice bits for my Inquisimunda box. When I chucked them in I spotted another cherub with book, oops!
I was waiting for these. A new varnish to try out, a new bottle of Pale Sand that I use for drybrushing my dirt bases as the old one was really spent, a red primer to try out, and plenty of Ammo stuff. I'll be using the green slimes on rocks, buildings and the fountains, looking forward to that. I will play a bit with the rusts too.
Other then work on the sci-fi junk I only based up 6 rats that I got off some Skaven sprues I got for free a while back. Sure, they are not giant rats, but good enough for me, and free.
Mouldine cleaning, sand on the base and a quick paintjob. Can't remember ever painting rats though, will have to look into that.
Slow progress on the Inca temple base, filled in the holes (needs a bit os fine sanding) and covered the hole with a plate so I can use still water effects to create a shallow pond (well, I'll paint it pretty dark, so maybe not that shallow).
Also made a few printouts of a Fallout 3 building that I want to copy for my foamboard try outs soon. I noticed a similarity between the Terrain Tutors foam building build tutorial here >
And this building:
...so I will use that as a reference to copy it as my first building for TNT.
I'll be darting between 28mm Sci-fi and 28mm Fantasy for a bit now. Get more games in. 20mm can come later, no worries.
Now, to score some more Space Marine bikes for scenery conversions and rust painting skill enhancement. Already traded some wolves for 2, and I just got offered 6 more so out come the bits boxes or in this case the promise of a scratch built building or 2 for free! (and thats enough, thank you, these will be for scatter scenery.)
Not something you are used of me, but next to wargaming I take great interest in our Dutch army (and our King...yes, I'm a Royalist), in particular the unit stationed at the Army base Oirschot, only a few miles from here. After years of neglect we are now in the position we can no longer train regularly with live ammunition due to costs after excessive cutbacks (like selling off ALL of our tanks....) <sigh> (Oddly enough I have 3 favorite units, 1 each from each of the branches of the armed forces. Navy - Anything named De Ruyter, Air Force - 322 Polly Grey Squadron and Army - 13th Light Brigade)
I modelled my 20mm Cold War army after a lot of pics taken there back then, and when there is a open Army day, once every 4 years I think it is, I make sure to visit (or do a wargames demo when I can). The 13th is currently transitioning from a Mechanised unit to a Motorised unit, and his Majesty came to inspect the troops and check up on the progress.
Now, while he is wearing a uniform he's no longer a soldier. He served, but after a 2013 change in our consitution members of the government cannot serve in our military at the same time, and he's head of the government. He has no rank, but a special Royal badge denoting his status. It's him on the right btw.
The Brigade "new style" falls in between the 11th Airmobile Brigade and the 43rd Mechanised Brigade, and being wheeled is faster and better able to respond in built up areas and over large distances. (and cheaper to run!) The CV90's will be replaced by Bushmasters, Mercedes Benz 280 CDI and a range of Boxers. They already have the Fennek and the Fuchs.
It will be interesting to see how these new changes will work out.
Currently, 1 half cupboard (40cm) is completely filled with paint and paint parafanalia, plus 1 shelf of a 80cm cupboard is filled with old GW paints dating back to pre 2000 ones.. Since I will be losing 2 cabinets worth of space when I move I had a small brainwave today while checking a server rack at work. Why not build paint racks in the same way?
Here's why. I paint by the numbers.
No, not like that :)
I've got a small book in which I note down my paint formulas for things that I have painted, so I can just grab the right numbers and repeat what I did the last time. Or one year ago. I hardly ever paint by grabbing paint from the shelf cause the colour looks right. Even when I had them all in front of me, I just don't work that way.
So, server rack? Well, a server rack crams all of the neccesities in the smallest, conveniest (well, mostly) amount of space times as many as need to fit in the widt of the thing. My current paintrack is one from Germany and holds 100 bottles of Vallejo in roughy a 27 deep, 36 wide and 33 tall space (all in cm's). If I put that on my table I lose almost half my table depth. So I put them in the half cabinet. So, how can I manage to halve the needed space and still have the paints (and future paints) that I need? Well, by doing it this way.
1 standard rack, custom made to fit my cabinet, will hold 30 pots of Vallejo. Each level has 11 cm's worth of space so I can get the pots out easily, 3 levels per rack, enough width for 10 pots of paint and a 2cm bar in front of the pots for labelling and holding them in place. I can fit in 11 racks with space left over because the door has a hinge portruding on the inside (Billy cabinet, Ikea). In total that would be 330 pots of paint. I've asked a few friends, who have acces to lasercutters, to draw me up one plus to give me an idea for the costs per rack for 8 normal ones and 2 wider ones to hold my weathering powders and filters (seeing I bought another 7 bottles the other night). If you are still clueless how this will look, think of it as a encycopledia of several books, each book being a rack with paint.
I've discussed this with Kim, explained her why I want this, that I will have the idea examined first, that I will sell off the paints I no longer need as well as the current paint racks to fund this, and that I have my budget fixed at 50 euros. And she agreed. :)
Now, back to painting.
Edit: Not half bad this. But I thinkl I can do better.
Stupid me. Asked Modhail to pick up a bottle of the GW Niksomething Oxide, he passes it to me on friday before the game and.....now it´s gone. Not in my boxes or bags. So goodbye weekendplans of finishing the statues and making even more of them. No sir.
So I grabbed the nearest box and out came )some of' my sci/fi scrap. Black basecoat didn´t go on too well, looks to be a combo of almost empty can doing funny things and maybe a bit of mould release agent on some of them, but another blast of grey primer sorted them.
Going for fast and simple in combination with learning more about filters. I ordered a couple of new ones lastnight, they should arrive by the end of the week, but till then I´ll keep my focus on using the streaky grime and learning what it can and what it can´t do. Less is better, for a much lighter tone.
Anyway, pics talk better then I can.
4 on the right have a not-so-matte varnish applied and are almost dry, the one on the right I had prepared earlier so I went with that. Just streaky grime, applied a bit too heavy I think but not a bad result. I will tone it down on the others. Decided not to paint the base first this time as I wasn't sure how much of the washes and filters would pool. Turns out I did not need to worry, but keeping that stage for last isn't such a bad idea anyway. Some well placed tufts will cover any unsightly holes underneath the scrap.
Some errors were made during this battle. No egos were harmed. Lots of fun was had, and 2 more are enthusiastic about the game.
I brought almost my entire scenery collection tonight, plus a selection of miniatures, playsheets etc. All 3 of us had the book, but me, guiding the other two, was the only one using it.
I created lots of cover points and managed to fill the enttire 120x80 table. The guys played a very tactical game, hiding as much as possible, and casting leap tons of times (too much in fact, they used it on each others teams too to drag the treasure carrier back from the edge. Great fun, but not allowed! Oops!) Also a great favorite of Henri was casting wall, I think he succesfully cast 4 or 5 of the things.
And it worked perfectly for him, screening his force from being attacked by Modhail. We used the variable game length mod and the treasure not off the table and in your hands - 50% chance you have it - mod. Also, no XP for wizards killing stuff. They did not really need it, Henri had in 7 turns 13 succesful castings and Modhail had 9. And not just on the easy spells either, even 14's to cast were on target. They did not go for kills either, purely to get the treasure and get out again asap.
Bringing the counter with troll poo cause an interesting result. Two turns in a row, they managed to activate a Snow Troll, each time at the exact same starting point. Some impressive shooting managed to kill one, and after some sacrificially cast Imps to delay the other he was blocked by a wall or 2. Other then that about half a dozen skeletons showed up. In the end, only 3 henchmen were killed (and 2 imps) and the game ended with 1 chest on the table in Henri's hands and the rest off table (3 for Modhail, 2 for Henri. Modhail had a great action, leaping one of his mercenaries to the top of the tower, grabbing the treasure in the next turn and then being leaped right back off the tower again. We laughed a lot at the results of some of the spells and their effects on our little men.
They both seriously enjoyed it. Henri is the most likely one to have an entire band painted within 2 weeks time, Modhail won't be too far behind finishing it this year I think. I've decided to focus on finishing as much scenery as possible before the years end, and then spend time on painting my warband. We'll meet up again in 2 weeks time, probably at my place so I want to have more finished.
Also nice, the local independent shopkeeper has decided to stock the Frostgrave rulebook and the mini's as well, so it looks like there will be some thursday night gaming in the future for me. Another reason to have painted stuff, it attracts more people.
I'm nackered now. The guys played from 20:30 to 23:30, picking up the rules very quickly, correcting some mistakes we made soon enough and like I said before, really enjoyed ourselves. And that is the best thing.
This weekend - Saturday night is the new gaming night with my wife - boardgames, and maybe some painting sundaynight.
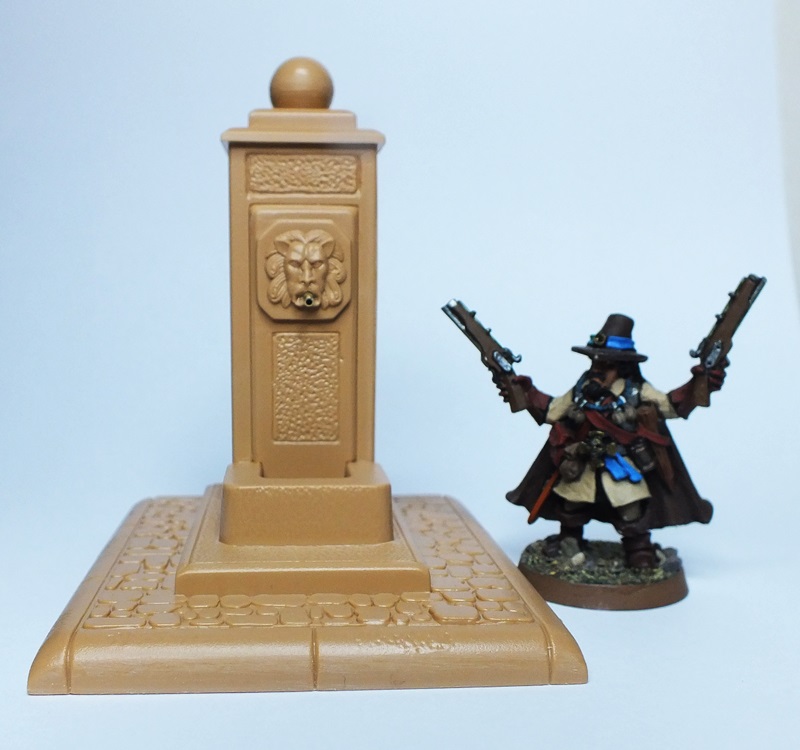
Saw this model in a Mordheim Youtube battle report by Guerillia Miniature Games and recognised it straight away from the Italeri catalogues of my youth. 5 minute deal on a kit swapping FB page, 3 week wait (he had it in his stash....somewhere....then his wife was supposed to post it but she misplaced it....) and 10 minute build. Only replaced the water spout with a more durable brass tube one. Suitable for Frostgrave and Mordheim (and Warhammer, and Moderns, and WW2 etc...)
(1/35 Italeri Village Fountain....an ancient piece of plastic)
Trial runs of Frostgrave tomorrow, so I'll basecoat this one in the evening or maybe saturday, paint sundayevening or somewhere next week, then weathering. I hope to get her done really soon.
Tried to paint tonight, but could not get into it, so packed all of the trade and sales stuff instead, labelled them and put them on the kitchen table. I want to get out tomorrow, so a great time to mail them. Small fortune in shipping costs, will be nice when the next paycheck comes in. It also reminds me I need to sell more. Anyway, Kim was pleased to see so much leave the house, bless her :)
Anyway, finished, I was shifting bags of bits left to right on my desk and I grabbed the GZG bag from the lot. The engines will have to wait as the vehicles are not here yet, but the drones I could start with. Well, 1 anyway. I removed what mouldlines it had, pinned all of the part together with fine wire and used a thicker rod for the stand. I reused the flight base by glueing it to a 20mm plastic base and sanding the edges. As Jon intended the model to be more in a fly (as the insect I mean) like position it has a hole in the chest for a flightstand. I wanted this one to be more upright in a attack position, like it just spotted something and it is facing a threat or target with his tri barrel laser, so I pinned it in the tail with a brass rod and repositioned it. I based it as just above a standard 20mm figure and the laser at headheight of a 28mm figure. (I know this makes it a bigger target but esthetically (?) it looks better and more imposing. I filled the hole with a Zinge Industries small socket from their socket set I picked up for some Adeptus Mechanicus conversions..
(Elhiem 20mm sniper for comparison)
This guy and the next will be in Chinese colours, so monocolour green with highlights and Chinese national markings on the head and numerals on the fans. I will filter that and add some light damage to them as I intend to use these for Post Apoc 28mm as well. 1 black, 1 red and 1 green or gold eye (representing the various camera types).
For 20mm I see them as PDF spotters and scouts, able to defend themselves with a carbine sized laser weapon. For 28mm I see them purely as scouts operating behind enemy lines while sending back data and being able to defend themself with a pepperpot laser pistol sized weapon, but nothing more then that. Now for 15mm... wait, I don't do that :)
Haven't got the foggiest what to name them though. They are a bit big for gnats, and I suspect they have a supressed but audible at short range buzzing sound from the duct fans. Can't have much armour, but speedy so not that easy to kill. I'll figure something out for it. Well, John calls them Hornet Drone so Giant Asian Hornet (Vespa Mandarina) is something to Google. Those things are big, so quite apt. One of the nick names is Yak-killer. I think I will stick to that, would be nice to have a Russian foe :)
I picked up these Forgeworld Sewer Entrances for 17 euros I believe at the local FB Wargamers market, unpainted, new in the bag (still counts as 2nd hand) back in March 2015. They look rather nice, with the hatches being numbered 1 till 6 in Roman numerals. They are long OOP like most of the good Forgeworld stuff. They are not all perfectly round as FW has a habit of taking things out of the mould too soon, but at first glance that is not very obvious. They do use a ton of releasing agent, mine were actually shiney from it. Several good scrubs managed to take that off. A bit more effort later removed all of the casting stalks too.
I based them on hexes as a the time I did not have suitable round bases and the hatches come with a circle of sculpted on crap that I did not want to remove. And a hex stands out to me like a round base does not. As these will be used as objectives or scenario specific encounter locations, I prefer it that way.
Originally these were painted with a mix of black metal and flat brown, but you can't see any of it after some stippling, washes and a bit of filter. After 2 coats of flat I went over them lightly with a pencil and rubbed it around a bit to get the current effect. A good healthy dose of tufts later and voila.
My idea beind these are the sewer hatches you see in Fallout 3, leading to underground areas.
(Necromunda model for scale (not painted by me))
I'm rather happy with them and will come in handy for games of Zombies, Pulp, Necromunda, Inquisitor/Munda, Modern and Horror as well as being more then suitable for Mordheim.
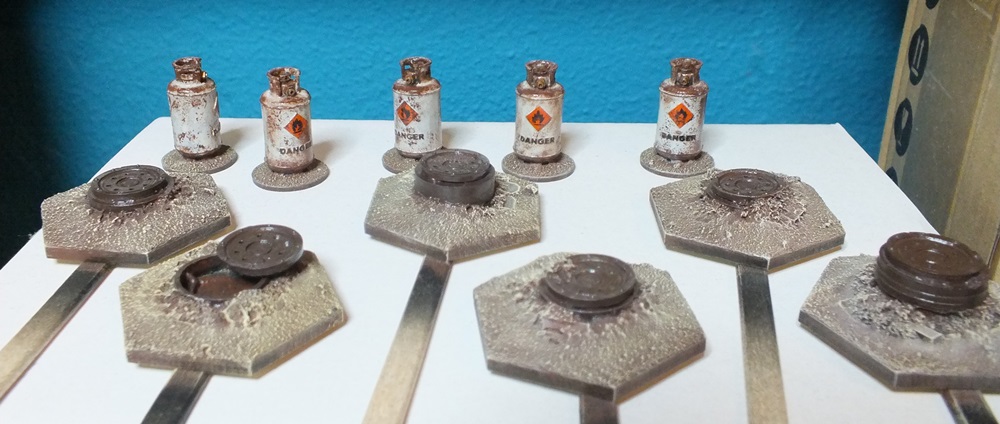
Instead of my usual method of doing all scratches and marks by hand, I tried the foam method tonight. Doesn't always do what I want, but can't beat the time won doing it like this, it is fast!
Did some extremely heavy weathering on these canisters, but I like it. The hatches I repainted with a mix of black steel and flat brown for that high manganese kind of look. Want them to be as generic as possible.
I just finished coating them all with gloss varnish cause I want to try something new (for me) tomorrownight. Got 2 bottles of Ammo MIG, Streaking Grime and Fuel Stains. I've never done this and I'm curious to what the results will be on the canisters. I've also got a bottle of AK Interactive Earth Effects that I want to use on the hatch covers, but if that doesn't work out I will experiment on them with weathering powders, I'm dying to try a few of those out as well (as I should as I have had quite a few of them for years now!).
Also, I repainted the statues according to some I saw on the Frostgrave FB page.
Loved the way they looked, so asked for the recipe. Turns out Shining Gold, Agrax Earthshade aka Brown Wash and then yada yada oxide (I just can't remember those dreadful names) is all I need to do. Repainted them with Vallejo Model Air Gold (well, more of a heavy drybrush) followed by a good wash with an old pot of Devlan Mud. And it did the trick. Painting bronze by painting them gold first. Huh, who figured that one?
I've asked Modhail for his rock colour mix so I can use it on the big statues, already finished their bases today. Sticking to Flat Brown base, Dark Sand drybrush and Pale Sand drybrush for now, looks good and almost the same as most of my previous work so it all ties in.
And gosh, look at the time. 2:30 in the morning. Good thing it's the weekend :)
4 Frostgrave treasuremarkers ready for gloss varnish. From 1 tot 4, all customs, 1. Pile of gold, 2. Medallion, 3. Statue and 4. Piece of Troll dung (that's my story and I'm sticking to it...since they ain't picky eaters you are bound to find magical rings and money in it :D )
So I've been looking at other peoples ideas for statues for the museum scenario for Frostgrave, and they either cost too much or they cost too much :)
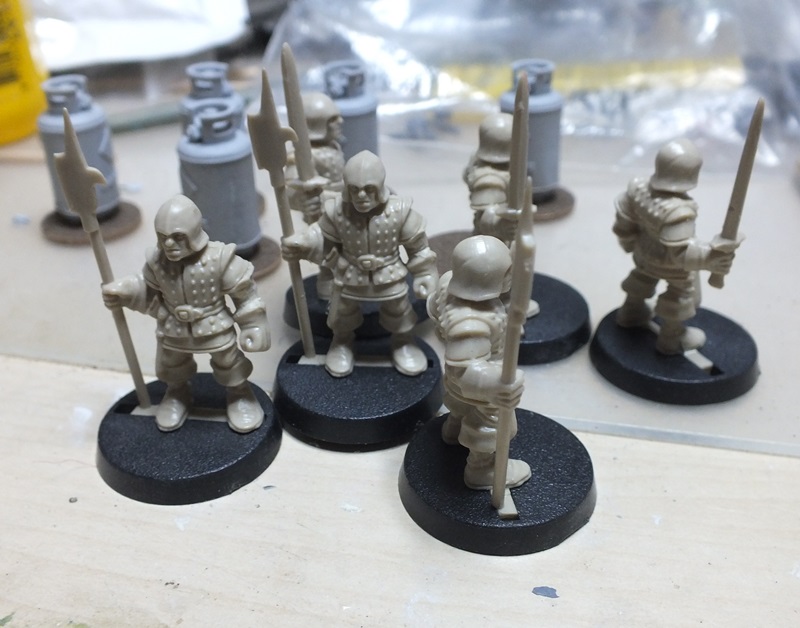
So I diverted my attention to cleaning (nothing much else I can do now that I'm sick) as the cabinet with all of my spraypaints is hidden behind a mound of crap. So, while digging out box after box I find these chaps.
Had not seen these for a while. Old Heroquest figures, got about a dozen of these plus some sprues of early Skaven. Well, they are quite static in their pose, and I have enough, so why not keep it simple, stupid (KISS). Perfect statues at zero cost :)
Snipped off their tabs, sanded the feet flat and just glued them to 20mm round bases. These will look the part once painted bronze/copper with patina....that is when I get that new GW Technical paint Yayyada Oxide something (stupid names). I might be able to pick up a pot next friday before going to Modhail.